blueberry lemon pie

apple tarte tatin

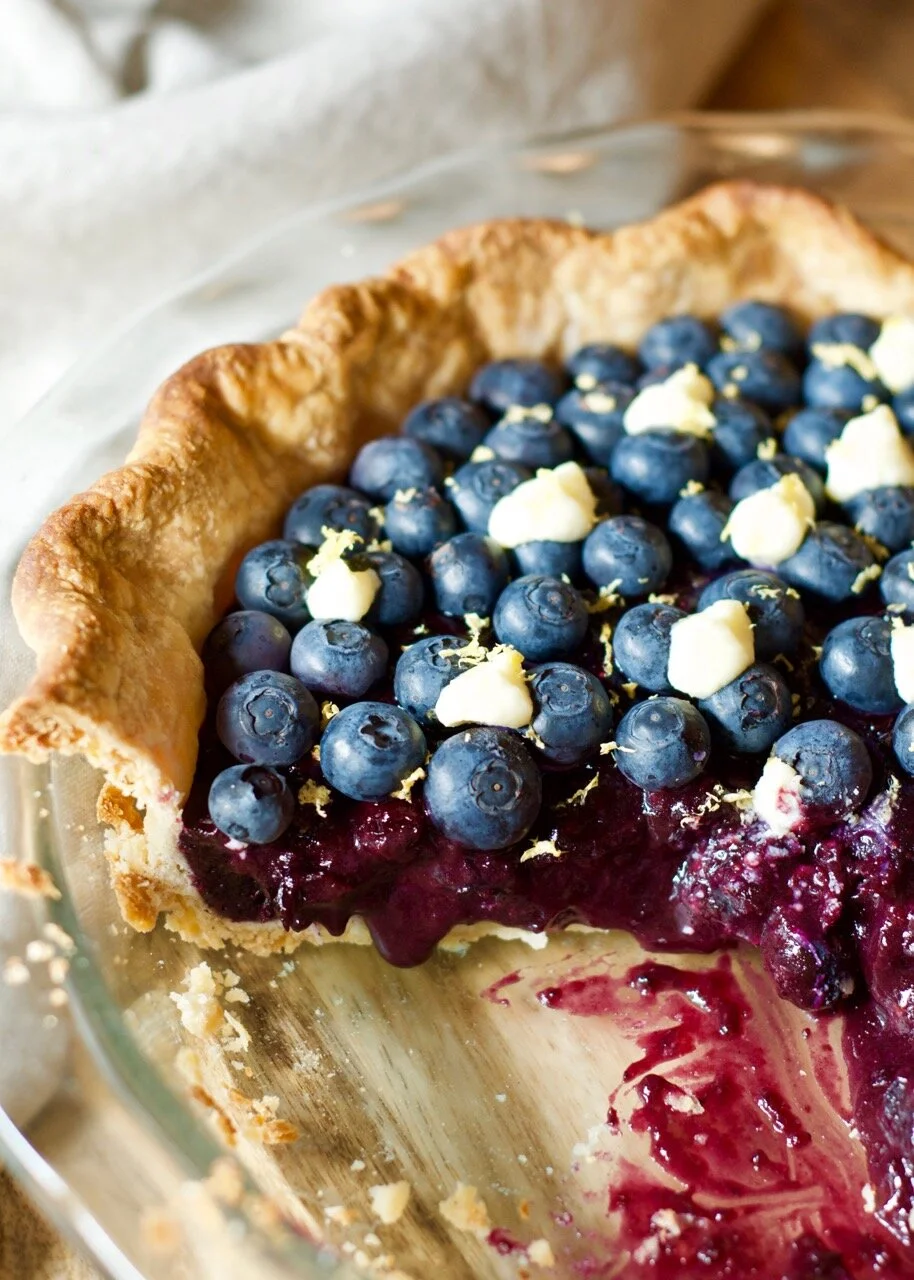
This recipe comes from Erin McDowell’s new cookbook, The Book on Pie. It is the type of pie to bring a smile to anyone’s face and the perfect antidote to a dreary winter day. The first thing you taste when you bite into a slice is an explosion of blueberry, followed by a bright pop of lemon with subtle hints of vanilla and cinnamon. Replacing the top layer of crust with fresh blueberries and fresh lemon zest basically makes this a fruit salad right?

A few tips for success:

  • The hardest part of this is letting the blueberry cool long enough to hold its shape when you cut out a slice. Give it at least 2-3 hours to cool out of the oven. (I think I’ve failed at this endeavor every time)

  • Yep, you didn’t read it wrong - the entire half lemon is added to the filling, not just the juice

  • The pie crust and filling can be separately made ahead of time

  • You can use fresh or frozen blueberries for the filling, just let the frozen blueberries defrost in the fridge overnight (or quickly zapped in the microwave if you can’t plan ahead like me).


Blueberry Lemon Pie

makes one 8 inch pie

ingredients

pie crust

1 1/4 AP flour

pinch of salt

1 stick cold unsalted butter, cut into 1 in cubes

6 tablespoons ice water + sprinkle more if needed

blueberry filling

5 cups blueberries

1/2 lemon

1 tablespoon vanilla paste

3/4 cup AP sugar

1/2 cup AP flour

1/2 teaspoon cinnamon

1/2 teaspoon salt

2 tablespoons unsalted butter

to finish

1 cup blueberries

lemon zest

mascarpone whipped cream (optional)

steps

pie crust:

Mixing dry ingredients with butter: Combine the AP flour and salt. Toss in the butter cubes (make sure the butter is as cold as possible) until the individual cubes are covered in flour.

Flatten the butter: Working quickly (so the butter doesn’t warm up too much), start flattening the butter pieces between your fingers until they’re the size of the walnut halves.

Hydrate: Drizzle in the ice water, and toss with the flour/butter mixture (like you would toss a salad - do not knead). The optimal hydration for your dough is to have it hold together in a ball with no floury streaks. If your dough is still too crumbly, add water slowly as a little water can go a long way. Form dough into a disk, wrap tightly and rest in the fridge for at least 30-60 min.

Roll out the dough: On a well floured surface, roll out the dough until it is 1 inch larger than your pie pan. Transfer dough into the pan, trim the excess dough to leave a 1 inch overhang. Fold the edge of the dough under itself and press down until you have a smooth ridge. Crimp the edges using whatever style you prefer - I pinched the dough between my thumb and index finger on one hand, and my index finger on the other, forming a wavy edge. Dock the dough with a fork, and let the dough chill in the freezer for 30 min. At this point, preheat the oven to 425F.

Par bake: Line the pie with parchment/aluminum, and fill with weights (pie weights, beans, rice etc.). Bake for 15 minutes, before removing the weights and continuing to bake for another 5-10 minutes until edges are brown and the bottom is cooked through. Set aside to cool.

blueberry filling:

Prepare the lemon: Remove the seeds. Roughly chop the half of a lemon including the peel, saving any lemon juice that squeezes out.

Cook the filling: In a medium pot, add the lemon we just chopped, 2 cups of blueberries, vanilla paste, 1/2 cup sugar over medium heat until the blueberries break down (8 - 10 minutes). Blend the mixture together until smooth. I used an immersion blender right in the pot. Bring mixture back to a simmer, and whisk in remaining 1/4 cup sugar with flour, cinnamon, and salt. Cook while whisking constantly until mixture comes to a simmer again and begins to thicken, 1 to 2 minutes. Stir in the remaining 3 cups of blueberries and butter. Let cool with plastic wrap directly on the surface.

Finishing the pie: Preheat oven to 425 F. Pour the blueberry filling into the par-baked crust and bake for 30 minutes. Once pie is cool to the touch, top with fresh blueberries, lemon zest, and some mascarpone whipped cream if desired. Let fully cool before serving.

Mascarpone whipped cream: Whisk a 50/50 mixture of mascarpone and heavy cream with honey to taste until soft peaks form.

blood orange meringue pie

apple tarte tatin

This pie is an easy alternative to the classic lemon meringue pie, using cold pressed blood orange juice which adds a more complex citrus note with a hint of bitterness. Topped with a mound of sky high airy meringue, this is the perfect antidote to those cold, wet dreary days.

DSC_4079.jpg

I use Erin McDowell’s all butter pie crust recipe for all my pies, which I’ve included below.

A few tips for success:

  • Don’t be afraid to properly hydrate your pie dough, I’ve found that a number of recipes often undershoot the amount of water needed for the dough to come together cohesively

  • The pie crust and filling can each be made ahead of time as we are making a fully cooked blind baked crust with a cooked curd.

  • I used a small kitchen blowtorch to toast the meringue, but if you don’t have one yet (I don’t love accumulating excess kitchen gadgets, but there is something incredibly satisfying with torching something!!), you can throw it under the oven broiler for a few minutes


Blood Orange Meringue Pie
makes 9.5 inch pie

ingredients

pie crust

1 1/4 AP flour

pinch of salt

1 stick cold unsalted butter, cut into 1 in cubes

6 tablespoons ice water + sprinkle more if needed

blood orange curd

1 1/2 cups blood orange juice

1/4 cup lemon juice (~ 1 lemon)

1/4 cup water

1 cup sugar

1/3 cup cornstarch

4 egg yolks (save the whites for the meringue)

italian meringue

2/3 cup sugar

1/4 cup water

4 egg whites (room temp)

1/2 teaspoon vinegar/lemon juice

steps

pie crust:

Mixing dry ingredients with butter: Combine the AP flour and salt. Toss in the butter cubes (make sure the butter is as cold as possible) until the individual cubes are covered in flour.

Flatten the butter: Working quickly (so the butter doesn’t warm up too much), start flattening the butter pieces between your fingers until they’re the size of the walnut halves.

Hydrate: Drizzle in the ice water, and toss with the flour/butter mixture (like you would toss a salad - do not knead). The optimal hydration for your dough is to have it hold together in a ball with no floury streaks. If your dough is still too crumbly, add water slowly as a little water can go a long way. Form dough into a disk, wrap tightly and rest in the fridge for at least 30-60 min.

Roll out the dough: On a well floured surface, roll out the dough until it is 1 inch larger than your pie pan. Transfer dough into the pan, trim the excess dough past 1 inch. Fold the edge of the dough under itself and press down until you have a smooth ridge. Crimp the edges using whatever style you prefer - I pinched the dough between my thumb and index finger on one hand, and my index finger on the other, forming a wavy edge. Dock the dough with a fork, and let the dough chill in the freezer for 30 min. At this point, preheat the oven to 425F.

Blind bake: Line the pie with parchment/aluminum, and fill with weights (pie weights, beans, rice etc.). Bake for 15 minutes, before removing the weights and continuing to bake for another 10-15 minutes until crust is golden brown. Set aside to cool.

blood orange curd:

Making the curd: In a saucepan, mix together the blood orange juice, lemon juice, water, sugar and cornstarch. Bring to a boil while whisking constantly until mixture begins to thicken.

Temper the egg yolks: Pour in a little of the orange curd and quickly whisk in with the egg yolks. Once thoroughly mixed, slowly pour the tempered egg yolks back in with the curd. Continue cooking on low heat while stirring until mixture is bubbling and thickened. Let cool, covered with plastic wrap directly on the surface to prevent a skin from forming.

italian meringue:

Preparing sugar syrup: In a saucepan over medium heat, bring the sugar and water to temperature of 235 F. When the syrup reaches 210 F, start whisking the meringue.

Whisking egg whites: In a separate clean bowl, start whisking the egg whites with the vinegar until soft peaks form. At this stage, the sugar should reach the right temperature. Slowly pour in the syrup with the mixer still running on slow, and bring the mixer back up to a high speed to continue beating until you reach stiff peaks.

putting it all together:

Fill the pie crust with the blood orange curd, leveling off the surface. Dollop the meringue over the curd, using the back of spoon to make decorative swirls. Give it a light toast with a blowtorch if you’d like, and serve immediately.

apple tarte tatin

apple tarte tatin

As we head into fall, I’m just sitting here wondering where the summer went? While I didn’t get to take some of the bigger vacations I had planned, this has been an unexpected opportunity for us to explore our own backyard a little more. We’ve spent the summer visiting farms throughout the Hudson Valley and gathering the seasonal produce as we went from strawberries and asparagus to blueberries and now peaches and corn. I’m a little sad to see the long summer days go, but as Taylor Swift said so wisely, “August sipped away like a bottle of wine”.

apple tarte tatin dessert

However, with the crisp air comes apple season! As you start to haul home your bags of freshly picked apples, this is the perfect time to get a little creative and instead of making a traditional apple pie, why not try a tarte tatin? It may be a few extra steps, but it is 100% worth it. The apples are cooked in a rich caramel until they melt in your mouth and topped with a buttery, flaky pastry crust before being flipped upside down to serve. Cooking the apples in caramel gives you a deep, rich flavor that you don’t get in regular apple pie.

For the crust, you can use either a pie-based pastry or puff pastry. I’m making a “rough puff”, which is essentially a cheater’s puff pastry, by making a few adjustments to the basic pie crust recipe to get a little more flakiness. While some recipes suggest making everything in one oven safe pan, I’ve actually elected to first cook my apples down in a large pan, before sending it into the oven in a round cake pan. The walls help the apples fit more snugly, and the lighter, more compact cake pan makes it easier to flip at the end.

DSC_3686 (1).jpg
DSC_3748.jpg

A few tips for success:

  • Use firm apples that will hold their shape. The first time I tried with granny smith apples, and the apples just dissolved into applesauce. Not pleasant.

  • Keep the dough cold throughout the rolling process. If you feel it warming up or the dough starts to feel greasy, stick it back into the fridge for 20 minutes before continuing.

  • Bake in a different pan than you use to cook the apples. It’s easier to use a larger pan to cook down the apples, and you have the flexibility to thicken the caramel sauce without overcooking the apples if needed.

  • When cutting out the dough shape, keep in mind the dough may shrink a bit in the oven so give yourself a little more to work with.


Apple Tarte Tatin
makes one tart

ingredients

for the pie crust:

1 1/4 cup flour

1/2 teaspoon salt

1 stick unsalted butter, chilled and cut in 1/2 in cubes

4 - 5 tablespoons ice water

for the filling:

6 medium sized firm apples (e.g. pink lady)

lemon juice (from half a lemon)

1 teaspoon cinnamon

2/3 cup sugar, sifted

3 tablespoons cold butter, cubed

steps

Preparing the pie crust

1. Mix dry ingredients: In a medium sized bowl, mix together the flour and salt

2. Incorporate butter with flour: Toss the butter with flour mixture until butter pieces are covered. Flatten the butter cubes either between your fingers or the palm of your hands. Continue until the butter pieces are the size of walnut pieces.

3. Hydrate: Sprinkle the ice water into the mixture one tablespoon at a time, using your fingers to lightly toss the flour in between water additions (use a light touch, similar to how you would toss a salad). At this stage, you want to add just enough water for the dough to come together. Once you’ve added 4 tablespoons of water, you may need to add a little more so continue to sprinkle water on the remaining dry spots. A properly hydrated dough should be able to stay together but not tacky to the touch. If butter has started to melt, stick the dough back into the freezer for a few minutes.

4. Fold: To create even more layers + help the dough come together, roll out the dough and using a bench scraper, fold it back over itself in thirds (like an envelope). Turn 90 degrees and repeat. Cover with plastic wrap and refrigerate for 30 min, before repeating the folding process (rolling out twice in each turn) two more times. It is important to keep the dough cold, to prevent the butter from melting into the dough. Keep refrigerated until ready for use.

Preparing the filling

Preheat oven to 400 F

1. Prepare apples: Peel, core, and cut apples into quarters. Toss with lemon juice and cinnamon.

2. Make caramel: Over medium heat, sprinkle half the sugar into the pan in thin, even layer. Do not disturb, as the sugar starts to melt and caramelize. Sprinkle in the rest of the sugar, and turn heat down to low to prevent caramel from burning. Continue cooking until caramel reaches a rich amber color.

Caramel tips: Use a dry pan with no water. Avoid stirring, though it’s fine to use a spatula to get all the sugar around the edges incorporated.

3. Add butter: Whisk in the butter cubes. The caramel will initially look like its seizing up, but as you continue to whisk, it will smooth out and the color will turn more toffee like.

4. Cook apples: Add the apple quarters to the caramel, with heat on low simmer. Mix so that all the apples are tossed in the caramel. As the caramel touches the cooler apples, they may harden at first but don’t worry, as the apples start to release their juices, the caramel will loosen up into a syrup. Continue cooking the apples for 10 - 15 min, until the apples have softened up and are no longer crispy. Let cool for 10 minutes.

5. Roll out the crust: Roll out the pastry dough to just under 1/4 inch thickness. Cut out a circle, leaving 1 extra inch around the circumference of your pan. Set aside.

6. Arrange apples: Transfer the apples into the cake pan, and arrange the apples with the cut edge facing up. Keep the apples fit snugly, with about 2/3 overlap. Spoon remaining caramel sauce over the apples. Transfer the pastry circle you just rolled out over the apples, tucking in the dough around the edges. If your apples are still a little warm, your dough may get soft quickly and it may be easier to use a spatula to help tuck the dough in around the edges.

7. Bake for 30-35 minutes, until pastry is golden brown. If serving immediately: let cool for 15 min, place a plate over the pan, and quickly flip the pan over. If serving later, reheat the pan to loosen up the caramel (the apples can get stuck if the pan if the caramel has thickened too much) before flipping. Serve with some vanilla ice cream or whipped cream.