two little red hens' brooklyn blackout cake

apple tarte tatin

Two Little Red Hens is a beloved bakery on the Upper East Side in NYC and they’re well known for pies and cheesecakes amongst many other delicious baked goods but in particular, their brooklyn blackout cake is superb. It is a rich and decadent explosion of chocolate and not for the faint of heart. While the cake itself is light, once sandwiched between layers of pudding each bite is velvety smooth. Did I maybe consider proximity to Two Little Red Hens a factor when looking for an apartment? Perhaps.

I would encourage everyone to make it a pit stop when visiting NYC (over some other well known bakeries, like Magnolia) but I hate to be the bearer of bad news. Unfortunately, Two Little Red Hens has been closed for renovations for the past year and are now looking for a new location (hopefully still in this neighborhood) with no estimated date for reopening. This has clearly been a very challenging time for people in this neighborhood.

Finally, I decided to take matters into my own hands and I present to you my version of the Two Little Red Hens brooklyn blackout cake.

brooklyn blackout cake

What is brooklyn blackout cake?

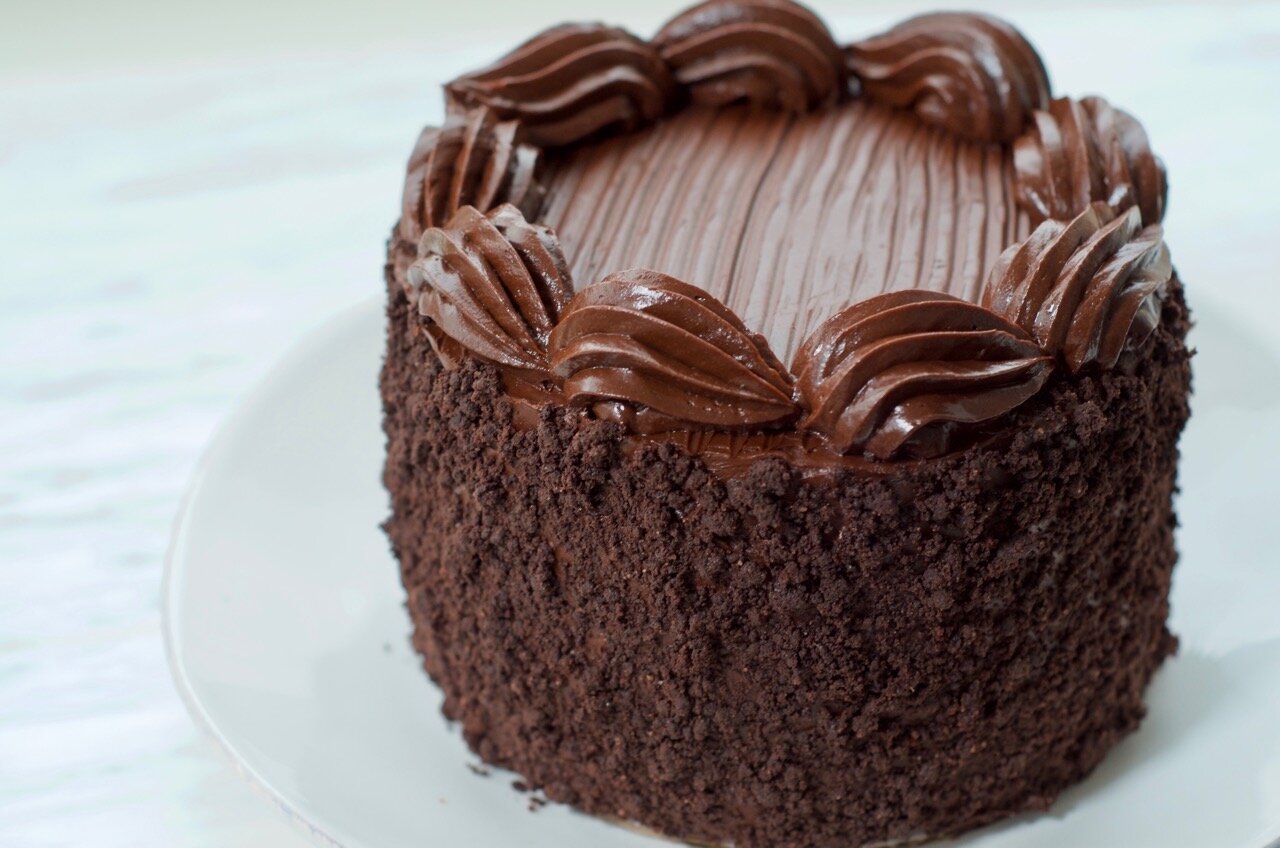
Think chocolate on chocolate on chocolate with a side of chocolate. We’ve got 4 layers of chocolate cake filled with chocolate pudding and covered in a chocolate fudge frosting. Then throw on some nice chocolate crunchies and there you go. If you like, no, love chocolate then this is the cake for you.

This is a cake where the quality of the ingredients really shines. Invest in the high quality cocoa powder and chocolate (I prefer Valrhona) because you will use these in every element of the cake. If you have more of a sweet tooth, feel free to use a lower percentage chocolate - I prefer 60% bittersweet - or bump up the sugar a bit to your taste. I wanted more of the bittersweet qualities of the chocolate to shine through as this is a cake that can easily get weighed down by all its components.

IMG_2992.JPG
IMG_2996.JPG
IMG_3004.JPG

A few tips:

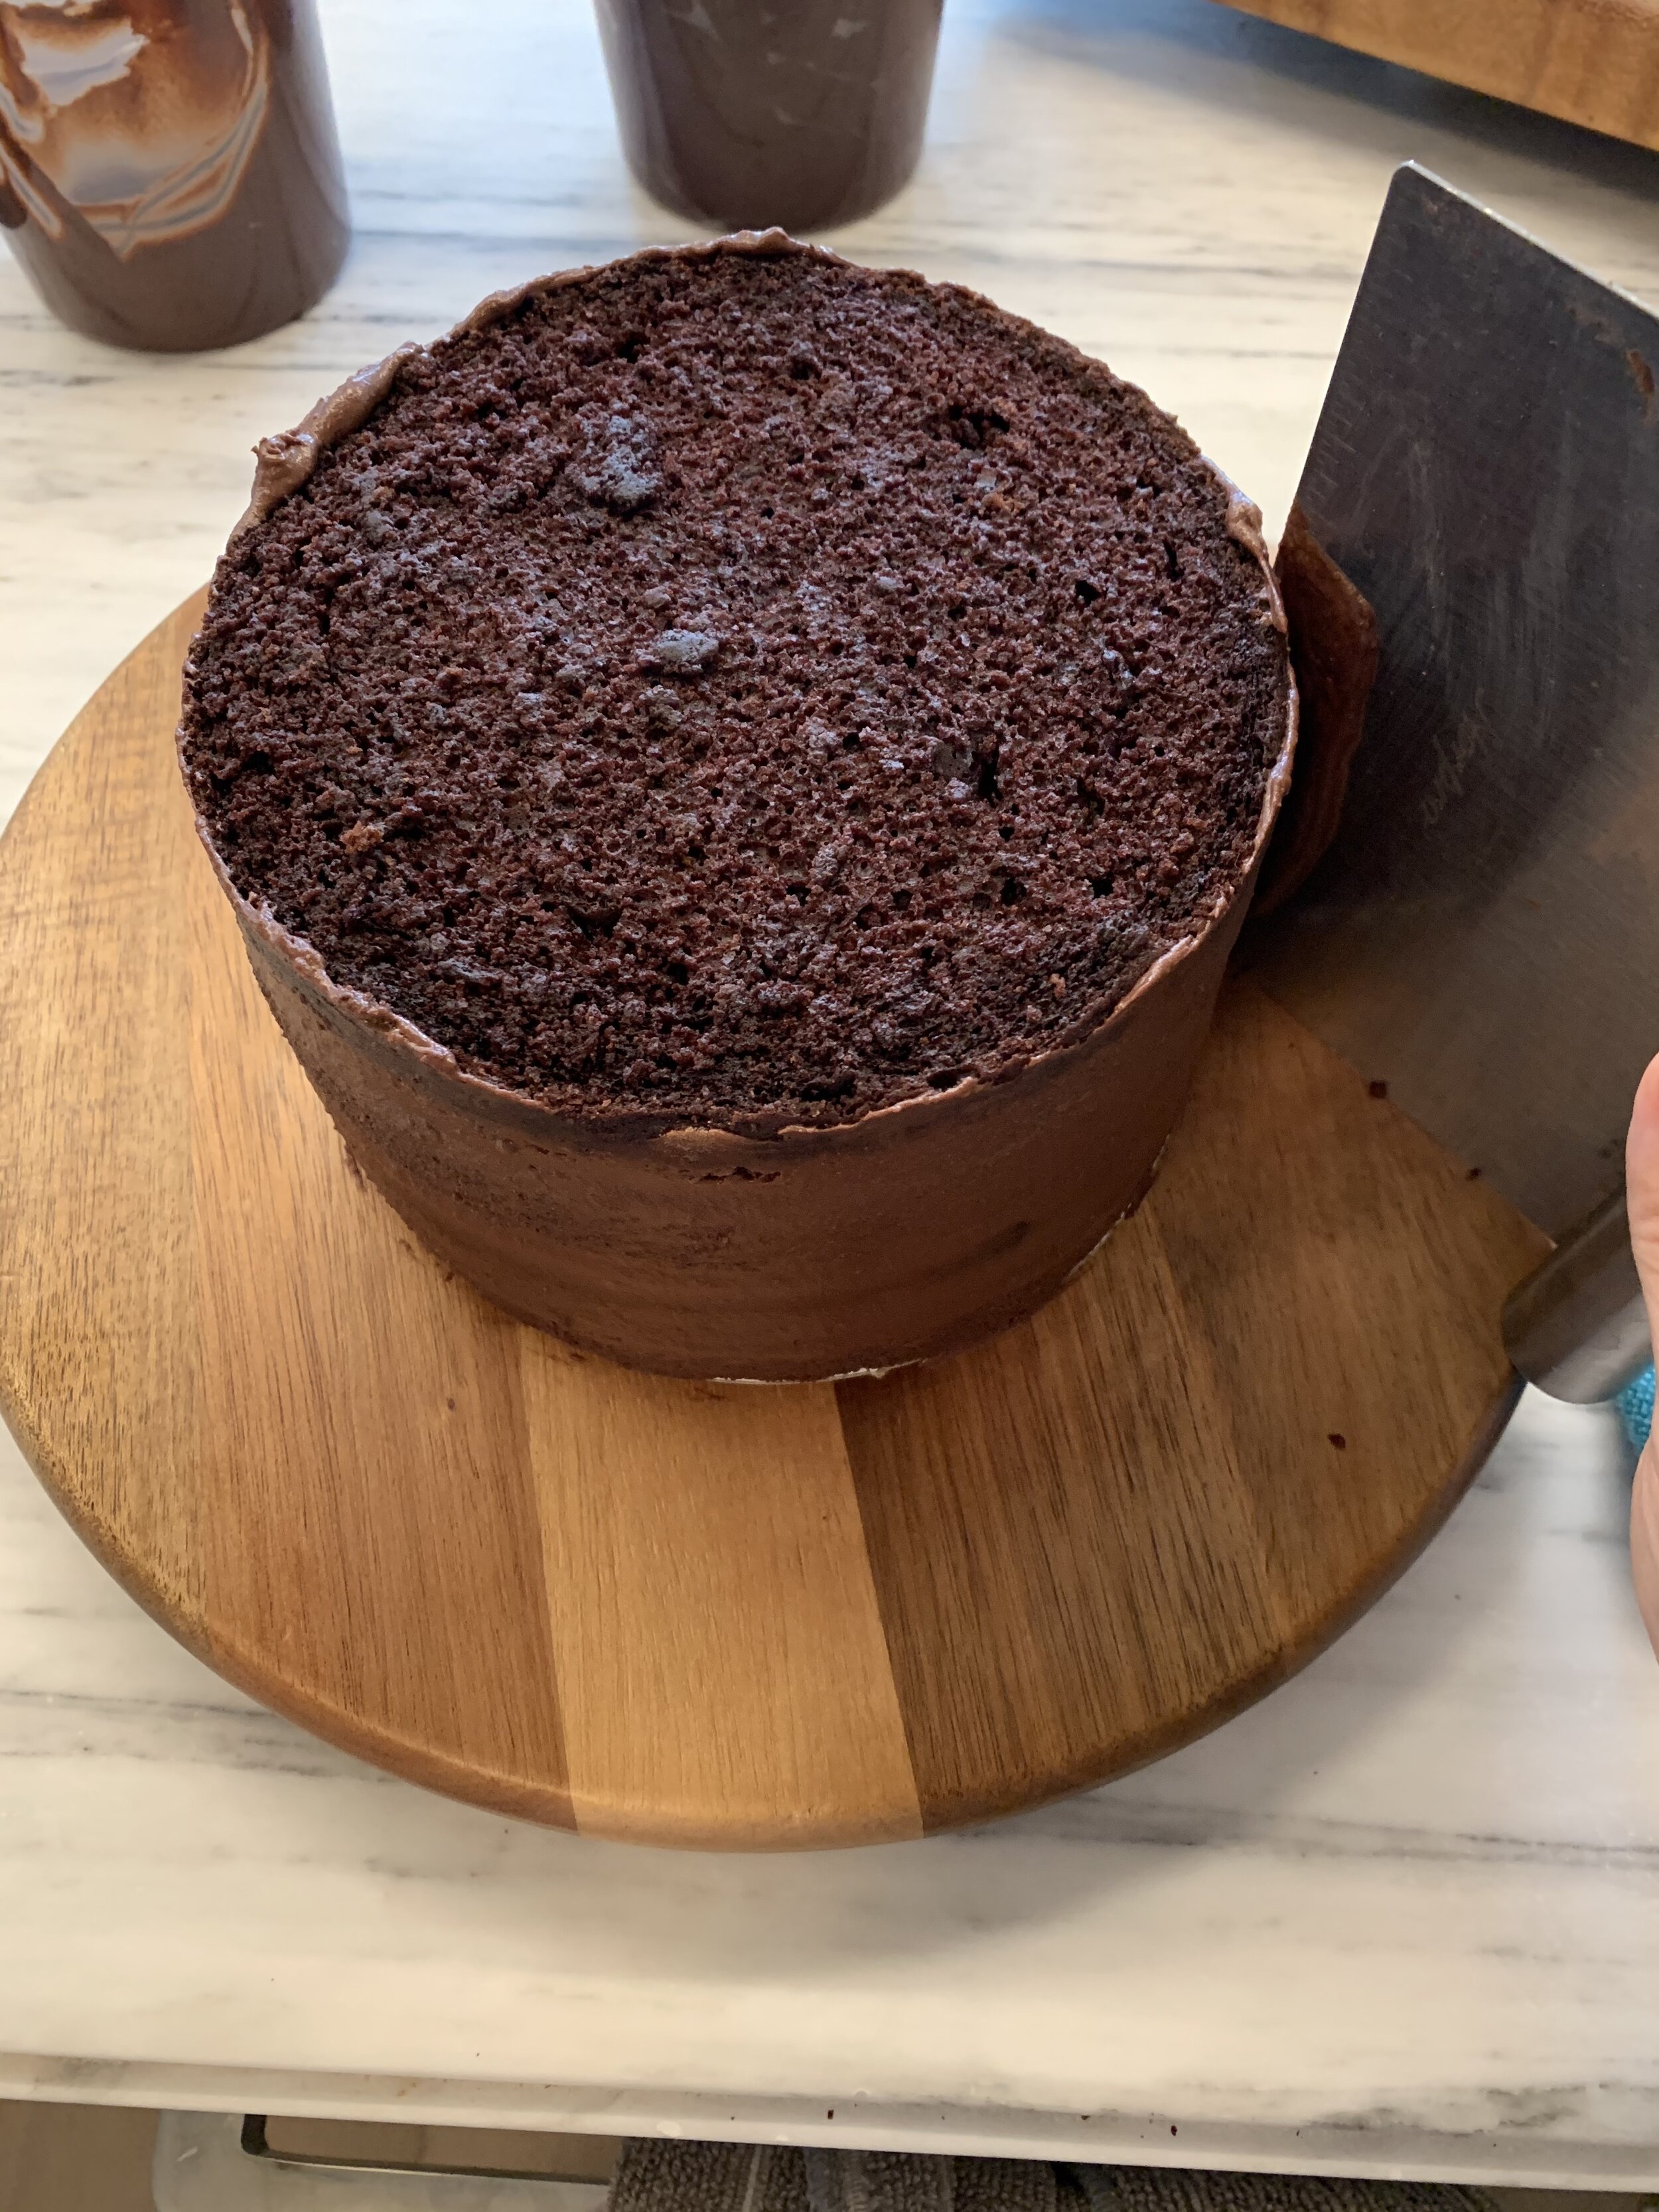
  • It is very important to make sure the cakes are properly cooled before slicing and frosting.

  • Build the cake on a cake board which helps you move the cake and keep your layers neat and organized. It is cheap to order a pack from Amazon or any cake supply shop.

  • Each of the components can be easily made ahead of time and stored in the fridge until you’re ready to build the cake.

  • The tools you need to create a neatly iced cake are an offset spatula and bench scraper. Use the offset spatula to spread the icing onto the cake and the bench scraper to create the clean edges. To create the patterned look on top, use a serrated knife to lightly scrape the frosting.

  • When frosting, starting with a crumb coat is necessary to create a clean finished look and prevents any cake crumbs from mixing in with your final frosting. To make the final frosting even easier, stick the cake into the fridge for 20 min after applying the crumb coat to firm it up a little bit.


two little red hens’ brooklyn blackout cake

makes one 6 inch cake

ingredients

for the chocolate cake:

2 cups AP flour

1/2 cup high quality cocoa powder (Valrhona)

1 cup sugar

1 teaspoon salt

2 teaspoons baking soda

1 teaspoon baking powder

2 eggs

1/2 cup vegetable oil

1/4 cup sour cream

3/4 cup buttermilk

1/2 cup hot water

1 shot espresso (optional)

1/2 teaspoon vanilla paste (optional)

for the chocolate pudding:

2 + 1/2 cups of whole milk

1/2 cup sugar

1 teaspoon salt

2 tablespoons cornstarch

3 tablespoons cocoa powder (Valrhona)

1 egg + 2 egg yolks

5 ounces bittersweet chocolate (60%), chopped

2 tablespoons unsalted butter

1/2 teaspoon vanilla paste (optional)

for the fudge frosting:

1 stick (1/2 cup) unsalted butter, room temp

3/4 cup powdered sugar

1/4 cup cocoa powder

3/4 cup heavy cream

5 ounces bittersweet chocolate (60%), chopped

for the chocolate crumble:

1/3 cup AP flour

2 teaspoons cornstarch

1/4 cup sugar

1/3 cup cocoa powder (Valrhona)

4 tablespoons melted butter

steps

chocolate cake:

Preheat oven to 350 F.

1. Prepare the 6 inch cake pans: Wipe the inside of your cake pans with butter and dust with some flour. Cut a sheet of circular parchment paper to line the bottom of your pan to ensure that your cakes will have no problem coming out.

2. Mix dry ingredients: Sift together the flour, cocoa powder, sugar, salt, baking soda, and baking powder in large bowl. Set aside.

3. Combine wet ingredients: Mix together the eggs, vegetable oil, buttermilk, sour cream, espresso and vanilla paste (if using). You won’t be able to explicitly taste the espresso and vanilla but it helps deepen the chocolate flavor.

4. Mixing everything together: Using the paddle attachment of a stand mixer, mix together the dry ingredients with the wet. As the mixture begins to come together, pour in the hot water. Mix until just combined - you will have a thin batter - and pour evenly between your two prepared cake pans.

5. Bake: Bake in the preheated oven for ~25 minutes, or until the cake is springy to the touch and an inserted toothpick in the center comes out clean.

6. Trim the cake tops: Once cake is completely cool, remove from pan and using a serrated knife, cut off the domed top of the cakes until flat. Wrap in plastic and store in refrigerator until ready to frost.

chocolate pudding:

1. Make a cornstarch slurry: In a small bowl, mix together 1/2 cup milk, cornstarch and cocoa powder until no lumps remain.

2. Heat up milk: In a saucepan, bring the rest of the milk, sugar, and salt to a boil. Stir to make sure the sugar gets dissolved evenly. Mix in the cornstarch mixture whisking constantly until the mixture thickens to coat the back of a spoon.

3. Mix in eggs: In a heatproof bowl, whisk the eggs together. Gradually whisk in half of the hot milk mixture until evenly mixed and pour everything back into the saucepan. Continue cooking over moderate heat, continuing to whisk, until mixture comes to a boil.

4. Finish with chocolate and butter: Mix in the chocolate, butter, and vanilla (if using) and whisk until everything is melted and fully incorporated. Transfer pudding into a container with plastic wrap directly pressed against the surface and refrigerate for ~2 hours.

fudge frosting:

1. Cream butter: In a stand mixer with paddle attachment, cream the butter until smooth at medium speed. Adjust to low speed and mix in the powdered sugar and cocoa powder until evenly mixed.

2. Mix in chocolate: Heat up the heavy cream in a saucepan until simmering and pour over the chocolate. Leave for 30 seconds, and mix until all the chocolate and heavy cream are evenly mixed into a chocolate ganache. Pour the chocolate into the buttercream and mix on medium speed until evenly incorporated. Refrigerate for 30 min to let the frosting firm up.

chocolate crumble:

Preheat oven to 300 F

1. Mix dry ingredients: In a stand mixer with paddle attachment, add the flour, cornstarch, sugar, and cocoa powder and mix together on low speed.

2. Add butter: Add in the butter and continue mixing to evenly mix with the dry ingredients until the mixture starts to clump together.

3. Bake: Spread onto a baking sheet and bake for 20 minutes. The crumbs will still be somewhat soft and will harden as they cool.

putting it all together:

preparing the cake: once the cake is fully cool, use a serrated knife to slice off the domed tops of the cakes and slice each cake in half through the middle horizontally to get 4 even layers of cake.

the rest of the cake should be compiled as follows. You should have the pudding, fudge, and chocolate crumble ready at hand along with an offset spatula and bench scraper.

  1. Prepare a cardboard cake round on a spinning turntable. Add the first layer of cake followed by a layer of pudding using an offset spatula. Continue alternating between cake and pudding until you add your final layer of cake. Use the leftover pudding to apply a thin crumb coat.

  2. Frost the outside layer with the fudge frosting, using the bench scraper to help even out the frosting. Use a serrated knife to gently imprint a pattern on the top of the cake.

  3. Gently press the chocolate crumble around the sides of the cake

  4. Prepare a piping bag fitted with a large star tip and fill with all the leftover fudge. Pipe large shells around the edge on top of the cake.

ultimate ice cream birthday cake

apple tarte tatin

Ice cream cakes deserve far more love beyond your 12th birthday party. As much nostalgia I have for the large rectangular slabs of ice cream cake from Baskin Robbins or Cold Stone, ice cream cakes can be reimagined to become a go-to celebration cake no matter your age.

slice of chocolate ice cream cake with meringue

Ice cream cake should be cake

Ice cream cakes can deliver so much more beyond being ice cream in the shape of a cake. Ice cream acts as a fantastic alternative to frosting that is both the star of the show and a complement to cake - because at the end of the day, what is ice cream cake without cake?

To save time, I bought some ice cream from a neighborhood ice cream shop Emack & Bolio’s, grasshopper pie and cookie monster. You can choose to use whatever combination of ice cream flavors, but I would recommend sourcing high quality ice cream with some mixin’s, whether you head to a local ice cream shop or make it yourself.

The two layers of moist chocolate cake is the foundation for the ice cream cake. It is made with vegetable oil and buttermilk, keeping in mind that we need the cake to stay soft and moist in a dry freezer. The fudge drizzle (recipe from David Lebovitz) doesn’t solidify in the freezer, and helps keep the cake moist while acting as delicious chocolate glue joining the cake and ice cream layers.

The italian meringue adds the perfect light, fluffy topping to the cake and if you have a kitchen torch on hand, gives it a a nicely toasted color and flavor.

How to decorate ice cream cake?

I took inspiration from how Milk Bar compiles their famous birthday cakes (which aren’t made of ice cream) by building the layers of cake and ice cream in acetate sheets. It helps create a beautiful ice cream cake with clean lines and minimal effort.

The layers are as follows: cake + fudge drizzle + ice cream (flavor 1) + cake + fudge drizzle + ice cream (flavor 2) + meringue topping (optional)

chocolate cake layer with fudge drizzle
carton of emack and bolio's for ice cream cake
first layer of ice cream cake

Use either a springform or just one of the cake pans that you baked the cakes in, line the bottom with plastic wrap to help later extract the cake from the pan, and cut a rectangular sheet of acetate a little longer than the circumference of the cake pan so that it sits just inside the walls of the cake pan with some overlap to prevent any fudge ice cream from spilling out.

I used an offset spatula to try to spread the drizzle and ice cream, but since we’re basically working in a tall cylinder, the easiest method would be to use a spoon bent 90 degrees. I did not feel like sacrificing any spoons, and while it may take a little longer, a small offset spatula will get the work done.

Planning ahead

This is a cake that you can easily make ahead of time, and keep it in the freezer until ready to serve. Each of the main components (cake, ice cream, drizzle) can be prepared ahead of time.

A few tips:

  • Move the ice cream from the freezer to the fridge 2-3 hours prior to building the cake so that it becomes soft and spreadable without melting

  • Make sure the cake is cooled completely. If you’re making it all in one day, move the ice cream into the fridge as you begin making the cake.

  • Let the cake sit in room temperature for 10-15 min before serving, as both the ice cream and cake will be too hard right out of the freezer

  • Clear enough space in the freezer prior to putting together the cake because you do not want to be scrambling to find space with your cake melting on the counter

  • You don’t have to use 6 inch cake rounds, but I wanted to make a cake that was feasible to finish for two people. Feel free to size up the cake for larger rounds or more tiers.


chocolate ice cream birthday cake

makes one two-tiered 6 inch cake

ingredients

for the chocolate cake:

2 cups AP flour

1/2 cup high quality cocoa powder (Valrhona)

1 cup sugar

1 teaspoon salt

2 teaspoons baking soda

1 teaspoon baking powder

2 eggs

1/2 cup vegetable oil

3/4 cup buttermilk

3/4 cup hot water

1 shot espresso (optional)

1/2 teaspoon vanilla paste (optional)

for the fudge drizzle:

1/4 cup sugar

2 tablespoons barley malt or corn syrup

1/4 cup water

3 tablespoons cocoa powder (Valrhona)

1/4 teaspoon vanilla paste

building the cake components:

2 pints of ice cream, softened in the fridge

2 layers of chocolate cake, chilled

fudge drizzle

for the italian meringue topping (optional):

2 egg whites, room temperature

1/2 teaspoon vinegar (optional)

1/2 cup sugar

1/4 cup water

steps

Chocolate cake:

Preheat oven to 350 F.

1. Prepare the 6 inch cake pans: Wipe the inside of your cake pans with butter and dust with some flour. Cut a sheet of circular parchment paper to line the bottom of your pan to ensure that your cakes will have no problem coming out.

2. Mix dry ingredients: Sift together the flour, cocoa powder, sugar, salt, baking soda, and baking powder in large bowl. Set aside.

3. Combine wet ingredients: Mix together the eggs, vegetable oil, buttermilk, espresso and vanilla paste (if using). You won’t be able to explicitly taste the espresso and vanilla but it helps deepen the chocolate flavor.

4. Mixing everything together: Using the paddle attachment of a stand mixer, mix together the dry ingredients with the wet. As the mixture begins to come together, pour in the hot water. Mix until just combined - you will have a thin batter, and pour evenly between your two prepared cake pans

5. Bake: Bake in the preheated oven for ~25 minutes, or until the cake is springy to the touch and an inserted toothpick in the center comes out clean.

6. Trim the cake tops: Once cake is completely cool, remove from pan and using a serrated knife, cut off the domed top of the cakes until flat.

Fudge drizzle:

In a saucepan, whisk together the sugar, syrup, water, and cocoa powder and cook over low-medium heat. Continue to whisk until mixture comes to a simmer for 1 minute. Stir in vanilla paste. Set aside and chill.

Building the cake:

Prepare the pan: Line a 6 inch cake pan with plastic wrap, with enough around the edges to help lift your cake out later. Line the walls of the cake pan with a sheet of acetate, cut to fit. The walls should extend past your cake pan depending on how tall you want your cake.

Start layering:

  1. First layer of cake

  2. Spread half the fudge drizzle on the cake. The ice cream will help push the drizzle out to the edges so focus more on the middle

  3. Spoon 1/2 - 3/4 pint of ice cream and evenly spread it over the cake. Make sure to fully meet the edge of the acetate. Firm up in the freezer for 15 minutes

  4. Second layer of cake

  5. Remaining fudge drizzle

  6. Spoon 1/2 - 3/4 pint of second ice cream. Take care to keep this layer as even as possible as this will be visible when serving. Let it sit in freezer, with the acetate and in the cake pan, for at least 4+ hours. Once the ice cream has firmed up again, you should be able to easily pop the cake out in one piece from the cake pan with the help of the plastic wrap, and remove the acetate.

Italian meringue topping (optional):

1. Meringue base: Using the whisk attachment, start beating the egg whites and vinegar together until soft peaks form.

2. Sugar syrup: I’m using an Italian meringue method to partially cook the meringue as we won’t be baking it. Simultaneously as you start running the mixer with the egg whites, add the sugar and water to a saucepan and bring to a temperature of 235 F, otherwise known as the soft ball stage. If you meringue is going faster than your sugar syrup, turn down the speed of the mixer but don’t stop it.

3. Adding in the sugar: Once the sugar has come to temp, keep mixer on low as you pour in the sugar syrup into the meringue. Make sure to do this along the edge of the bowl where it meets the meringue. Once the sugar is in, turn the mixer back on high until the meringue reaches stiff peaks. Use this meringue to pipe immediately.

4. Optional torching: If you have a kitchen torch handy, quickly bronze the dollops of meringue and return cake to freezer for 30 min before serving.